Tiny Tone - My First Accepted Tiny-Tapeout Design
Introduction
In this blog, I share a small but meaningful design I submitted to the TinyQV tapeout program, what it is, why it matters to me, and what I learned along the way. Before we understand what my design is all about, let’s be clear with some common terminologies I use in this blog.
What is TinyQV?
Tiny-QV is a collaborative competition under the Tiny Tapeout program. The goal is to build a small but complete RISC-V SoC, where the CPU and peripherals are designed to be simple and within the strict constraints of Tiny Tapeout.
At its heart is TinyQV, a lightweight RISC-V CPU that implements the RV32EC instruction set along with the Zcb and Zicond extensions.
The really fun part: the peripherals that complete the SoC are contributed by the open source community. Each submission is a chance to have your logic integrated into silicon and that’s where my project, Tiny-Tone, fits in.

What is Tapeout?
In chip design, tapeout is the moment when a design is functionally verified and sent off to be manufactured on real silicon. Back in the day, this really did involve shipping magnetic tapes to the fabrication plant and while the process is digital now, the name stuck around.
Tapeout is a milestone because it marks the point where your idea leaves the world of simulation and code, and takes its first steps toward becoming a physical chip. For many hardware designers, it’s the most exciting part of the journey.
Introducing Tiny-Tone
My contribution to Tiny QV is called Tiny-Tone: a PWM-based audio tone generator written in Bluespec SystemVerilog. The goal was simple create a small peripheral that could generate audible tones using just digital logic.
This design felt perfect for tapeout: it’s compact, demonstrable, and educational. When the chips come back, I’ll be able to hook up a speaker and hear it play tones( if I’m able to afford it :D ).
Understanding PWM (Pulse Width Modulation)
Imagine quickly flipping a light switch on and off. If it’s on half the time and off half the time, the average brightness looks like 50%. If it’s on 90% of the time, it looks almost fully bright. That’s the basic idea behind PWM: controlling the duty cycle, the fraction of time the signal is “on” vs. “off.”
For audio, we can do something similar. Instead of controlling brightness, the rapid on/off pattern controls how a speaker cone moves. If we switch fast enough, the speaker naturally smooths out the square wave, and what you hear is a steady tone.
In Tiny-Tone, I used PWM to generate these patterns at different frequencies. Changing the frequency changes the pitch of the tone, and adjusting the duty cycle changes its character. With just digital logic, you can make a speaker “sing.”
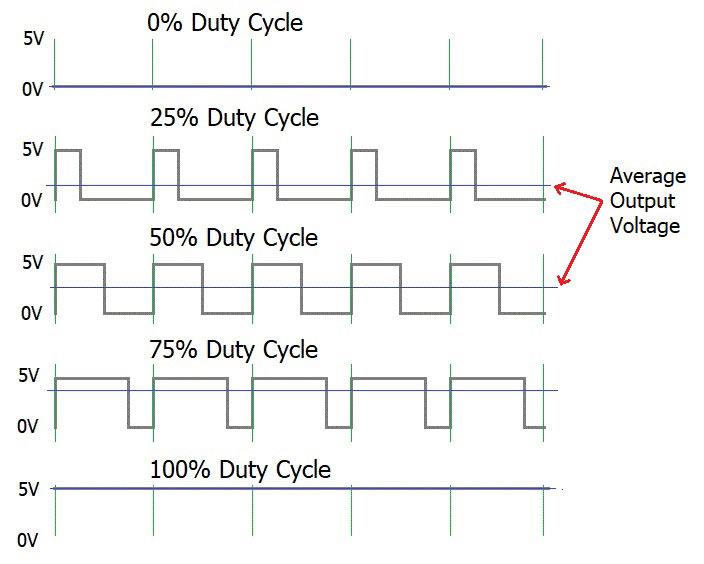
With Tiny-Tone, I can control the frequency of the PWM signal, which changes the pitch of the sound, and adjust the duty cycle, which changes how the sound feels when it comes out of the speaker.
PWM isn’t just for audio related operations, it’s everywhere. For example, the brightness of an LED is often controlled with PWM, and the speed of motors in drones or fans is set the same way.
My Implementation
I started by writing the RTL in Bluespec SystemVerilog, which is great for building modular hardware. Its rule-based approach and strong type system made it easy to organize the design cleanly.
The Tiny-Tone peripheral is essentially a small, configurable PWM generator that can be controlled from software. The design has two main parts:
-
Tone Generator – This module creates the PWM signal. You can enable or disable it and set the frequency at runtime. The output is a single digital line that toggles according to the programmed tone.
-
Peripheral Wrapper – This exposes the generator to the rest of the SoC using a simple memory-mapped interface. Software can turn the tone on/off, change the frequency, and read back status, all through a few registers.
I also wrote a Bluespec testbench to make sure everything worked as expected. It exercised the registers, ran the PWM signal, and verified that enabling/disabling the tone behaved correctly.
Finally, the design was compiled to Verilog for Tiny Tapeout, wrapped in a top-level harness, and paired with a Python cocotb testbench for automated simulation. This made integration with the SoC straightforward and allowed for continuous verification.
Challenges I Faced and How I Fixed Them
Every hardware design brings its own set of challenges, not just in writing RTL, but also in meeting real-world constraints like area limits, timing, and integration requirements. In my case, working with Bluespec SystemVerilog added an extra twist: I had to convert my design to Verilog before it could be accepted into Tiny Tapeout.
-
Integration with Tiny Tapeout
Adapting the Bluespec-generated Verilog to fit the Tiny-QV SoC interface wasn’t just a drop-in task. I needed to carefully map ports and build a wrapper so that my peripheral played nicely with the rest of the system.
-
Debugging the Peripheral
One tricky bug showed up during cocotb testing. When I wrote a word (e.g.,
0x82345678) to register0and tried reading back the byte at that address, I got0instead of the expected0x78.After digging into the generated Verilog, I realized the problem: my Bluespec peripheral only supported byte writes (
data_write_n == 2'b00), but the testbench was doing a word write (data_write_n == 2'b10).The Fix
The solution was simple once I understood the mismatch: I updated the test to use a byte write (
write_byte_reg) instead of a word write. Now the writes lined up with what the peripheral supported, and the test passed cleanly.This might sound like a small detail, but debugging it taught me a lot about how interfaces and toolchains can disagree and how important it is to understand what your generated RTL actually supports.
What I Learned
This project taught me a few valuable lessons:
-
Designing for tapeout constraints is very different from simulating freely. Every gate, every bit of logic matters.
-
Writing in a high-level HDL (like Bluespec) is powerful, but translating to Verilog forces you to think about the details.
-
The excitement of knowing your design will physically exist on silicon is unmatched :P
Tiny-Tone is my first accepted tapeout design, and it won’t be my last. The journey of taking this design from idea to tapeout has been just as exciting as waiting for the day it comes alive on silicon. This journey has been equal parts challenging and rewarding and it marks the start of many more hardware adventures.